FMC skin
Recently I tried to give a go at making FMC skin. Almost similar method to create FM 2013 skin except the parent-child relation of FMC skin is
base-widgets –> base –> fm2013-widgets–> fm2013 –> fmc2013-widgets –> fmc2013
How to change the backgrounds
I’ll give example by how to change the backgrounds in default FM 2013 dark skin. The basic idea is pretty much the same for change backgrounds or any graphical part in any football manager skins so this guide also cover early steps on skinning.
- First you chose the name of your new skin
for example you want to name it as “boobsk”
- create a folder with your new skin’s name under …[user documents]…\Sports Interactive\Football Manager 2013\skins\
so now I have …[user documents]…\Sports Interactive\Football Manager 2013\skins\boobsk\
- supposed you already have base skin resource, copy “fm2013 dark.xml” into your boobsk folder
- rename fm2013 dark.xml into the same name as the folder,
in this case it will be “boobsk.xml”
- I suggest to use notepad++ to edit xml files, when you open boobsk.xml , you will see :
<?xml version=”1.0″ encoding=”UTF-8″?>
<record>
<!– [some comments]->
<!– skin details –>
<string id=”name” value=”FM 2013 Dark[COMMENT: awesome default skin for FM 2013]”/>
<string id=”author” value=”Sports Interactive“/>
<string id=”description” value=”Default Skin“/>
<string id=”version” value=”1.0“/>
<flags id=”parent” value=”fm2013 dark-widgets“/>
<!–[some comments]–>
<string id=”required_version” value=”13.0.0″ translate=”false”/>
</record>
- you can change some fields in there as anything that you want
in this case, I’ll change them into:
<?xml version=”1.0″ encoding=”UTF-8″?>
<record>
<!– [some comments]->
<!– skin details –>
<string id=”name” value=”boobsk[COMMENT: change background of default FM 2013 dark skin]”/>
<string id=”author” value=”whoever“/>
<string id=”description” value=”whatever“/>
<string id=”version” value=”1.0“/>
<flags id=”parent” value=”fm2013 dark/>
<!–[some comments]–>
<string id=”required_version” value=”13.0.0″ translate=”false”/>
</record>
- after you save the xml file, you can see inside the game that your skin is now available to use

select your new skin, and reload it. It will be easier in skinning process if you tick “Reload skin when confirming changes in Preferences”. So you can do skinning while playing FM and you can directly see the effect of your customization just with simple skin reload hotkeys (default: “Shift+R”)
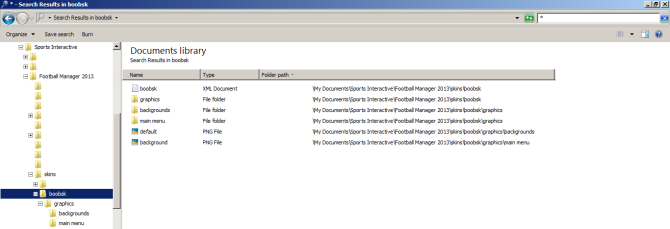
- back to change the backgrounds, create these folders and put images with their file names and directories exactly like this:
…[user documents]…\Sports Interactive\Football Manager 2013\skins\[your_skin_name]\graphics\backgrounds\default.png
and
…[user documents]…\Sports Interactive\Football Manager 2013\skins\[your_skin_name]\graphics\main menu\background.png
You can use any PNG image as long its resolution is not smaller than 1024 x 768 px . You can see the function of default.png and background.png by looking at their directory.
- summary
- reload the skin, voila

**of course you can skip the folders and files creation part and go straight into edit the specified images from the skin that you already have.. But I think this is more elegant way, more appreciation to the original skin maker, help you to back -up the part of the skin that you want to change and obviously resulting a much smaller file size if you decide to share your skin to everyone.
